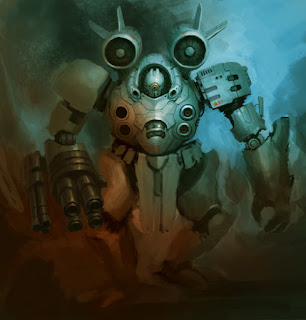
Here is the 3rd update of the Mecha robot concept design process (here is part 1: Mecha Robot step by step drawing and part2 Painting Mech process tutorial). I get about 30 mins to an hour a day to do this...little by little. Hopefully it will turn out nicely.
Here is the latest UPDATE!!! (Still more paint over and tweaking to do! :P)
Note on the update: I decided yellow probably isn't going to work in this design because I want a little more dramatic lighting effect for this particular drawing, painting, color concept design. So I will have to go with the off-white color (white to light gray). White would probably look slicker anyway in this particular design (kinda remind us of big airplane and such).
I will have to change it from yellow to gray or something similar.
Goto: Top menu in PS --> Layer --> New Adjustment Layer --> Color Balance
 You can use this tool to change and tweak your lighting however you like them to be.
Good rule to go by is...Cool light warm shadow vs Warm light cool shadow (Tips here -Color temperature warm vs cool for artist).
So I adjust Midtone then Highlight and Shadows until I get the yellow to change to off white color. Because I want to make underlight more dramatic that why I choose to go with the new color for the Mecha robot.
-Then, I decide to add the pilot cockpit onto its mid-section, figure it would make sense and it would definitely show the scale of the robot that we (human) can related to.
-Also I get a rid of the regtangular shapes on its shoulder. Because there is only one (two vents) regtangular element and the rest of the design are mostly round. So I decided to round it out with some sort of turbine jet engine look alike for vents to maintain the repetitive shape (consistency in design). ***there are some exceptions sometimes***
After all the changes, I think it looks a lot better and closer to what I am aiming for. **The off-white really does bring out the blue sky and the under-lighting effect :)
Anyway, Here is the color sketch so far (almost there)

Here are the updates: Painted over step by step
Then I changed the rocket launchers to twin vents.... so it fits. :)
Close Up shot of the Mecha body
Add some spicy yummy detail onto the big shape.
Here is the latest UPDATE!!! (Still more paint over and tweaking to do! :P)
To be continued
Go to: Previous post -Part1 Mecha Robot step by step drawing -Part2 Painting Mech process tutorial
Drawing Software & Tools I used and recommended:
-Wacom Intuos3 6X8 Pen Tablet or Genius MousePen 6x8
Softwares:
-Gimp (Free Download)
-Adobe Photoshop CS4
New Drawing Video tutorials:
-Painting tutorial limited color palette 001
-Portrait painting from life step by step
-Drawing body muscle and abs shading and render
-Painting from life session step by step tutorial
-Manga tutorial drawing background
FEATURE TUTORIALS:
-Draw and Paint Women Body Tutorial I: Female Manga Fusion I
-Draw and Paint Women Body Tutorial II: Female Manga Fusion II
-Character Design Tutorial: Dark Valkyrie
0 comments:
Post a Comment