Showing posts with label 9) Exposure. Show all posts

Thursday, July 12, 2007

Definition of Exposure

Same�what I like to do before writing the article or message in this blog, I had search in google.com for the definition of exposure and what I got are:

  • vulnerability to the elements; to the action of heat or cold or wind or rain; "exposure to the weather" or "they died from exposure";
  • he disclosure of something secret; "they feared exposure of their campaign plans"
  • aspect re light or wind; "the studio had a northern exposure"
  • the intensity of light falling on a photographic film or plate; "he used the wrong exposure"
  • photograph: a picture of a person or scene in the form of a print or transparent slide; recorded by a camera on light-sensitive material
  • the act of exposing film to light
  • In photography, exposure is the total amount of light allowed to fall on the film (or electronic sensor in the case of digital photography) during the process of taking a photograph. Exposure is measured in exposure value (ev), with higher values denoting more light.
  • �more

After I got the results, I think for me the exposure in photography are How much light you want in your shot and we can set that where in our picture should be bright or dark however, to understand the ways to control your light is need time and also need more practice. Besides, to know about exposure should really know about ISO, Aperture (F/stop) and also speed shutter.

Exposure: When I need to consider the exposure?

Let�s me say that all the time you are carrying the camera :) because of most of the time, you can just take the shot and press the shutter release. However, non forget to adjust the exposure only when you need it, Use this decision process:

Do I need to adjust the depth of field�If YES, make the comparing the sharp of background is sharper or lower than foreground then adjust your aperture/shutter or use the aperture priority mode.

The camera is designed for this scene you want to take or not? You can apply exposure to be under or over the scene.

Use the spot meter or lock the exposure for that part of the picture you want to lighting specific part and recompile the scene.

How about the shutter speed I want to have the movement in my picture ? If YES, adjust the aperture/shutter, or instead use the priority of shutter.


Besides,


If it is so dark such as with the sun behind? Overexpose the scene.
If it is so bright such as on fresh, bright snow? Try underexposing.

Exposure: Short setting tips

  • You do not need to always belief in your automatically exposure from your camera sometime it�s very exciting and challenging when you set your own exposure value, here is the suggestion of the situations:

  • Beware if�Very Bright Sunlight
  • Very bright sun can overcome your camera, specially if the scene is filled with intensely colored clothing (white shirt), reflective surfaces (such as mirror). You can take the under exposure -1 EV and then see the better result.


  • Beware if�The sun is behind your subject


    If you are taking a picture of someone or something that got the shadow from the reason that the sun is behind them. The bright background will cause the camera to underexpose the scene. You need to use the Spot meter to measure the light from the brighter thing before you take the shot of the under shadow things. Some say that to take a shot of an outdoor portrait is putting the sun over your shoulder. Even so, if you find the sun behind your subject, take the overexpose EV +1.


  • Beware if� Low Light
  • In low light, such as at night, indoors, or under thick cloud cover, you can often get better results by overexposing the scene slightly, such as with an EV +1. As you can see that how level of EV is depend on the dark level; if more dark should use high EV.


Exposure locking method

This technique comes from the 35 mm film camera and it is one of the very good tricks you can learn and master. Exposure lock is almost always achieved by just low press on the shutter then release, you will feel of the responding of the camera (not to let�s the shutter and take the picture)

The example of the processes of locking exposure when take a picture:

1. Slightly Press on shutter when you feel its response depress slightly, the camera will auto focus, lens locks the current subject
into sharp focus and the exposure is measured and locked.
2. When you ready more press to the shutter for take pictures. The camera then takes the picture and saves it to memory.

However, may be difference way to use exposure lock on difference camera you should study on its manual and sometime the budget camera or compact did not have this option.

Several people tell that a magic of exposure lock is that the light at where you lock exposure in will be used as the light for the picture you take after lock-in. For instance, If you lock-in the exposure from the white A4 then you continue take the picture of your blue bag the camera will use that �locked-in� exposure information regardless of where you later point the camera.

Exposure lock is a great tool for telling the camera that you�d like to take a picture with the exposure data from one specific part of the scene. Imagine, for instance, a scene like the one in the Color Insert. If we have a boy at the beach, standing in the water at sunset. The image can be dramatic, but only if exposed properly. We�d like to capture the overall dark tones inherent in a sunset scene, with exciting splashes of color to light up the subject in a subtle way. Just pointing the camera at the scene might result in the camera averaging the bright and dark bits of the picture, generating an image that might as well have been captured at midday. That would be quite ordinary and not at all what we want. Instead of taking the average picture, Try to lock the exposure you want before take to photograph. You can lock the exposure by any of exposure meter (Centre, Matrix or spot)

Exposure measuring method

You may wondering that how camera measure the light or exposure;
the camera�s exposure sensor = an exposure meter

To measure the exposure is very important thing for your shot because it tell you the amount of light is needed to adequately expose your picture. So it is important to have the knowledge about this thing!

3 Types of Measuring the light:

Center-Weighted Meters
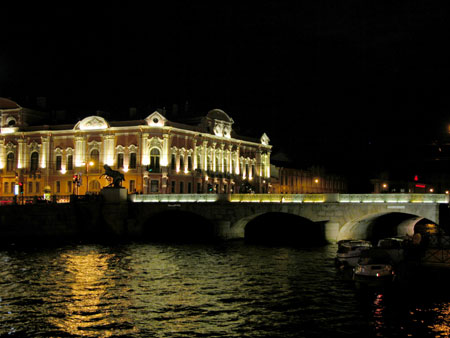
In the old days, most cameras came with a simple center-weighted light meter. This meter measures the light overall the image but take the more intense on the center of the frame you see in the view-finder.
We can say that usually it is a great one that you are most interested in the stuff in the front of the picture, Also you can the below picture for the example of this type of measuring.

Matrix Meters (Invented by Nikon)
This system is most prevalent in Nikon models, all the way from the CoolPix 950 and CoolPix 995 to the high-end D1x. The matrix meter by add more intense of light not only at the center but also intense on all of the 4 corners within a picture. Matrix meters gauge the light in many parts of the scene at once. Many people say that this type of measuring is the best for you to setting this mode all the time.

Spot Meters
As you know the meaning of spot; Spot is the specific point or may be part from whole picture. The spot meter is the optional for you if you do not want to use the centre weight or matrix meter As you can see below picture:


It will concentrate only on the center and ignore the rest of the frame completely. This make the ways to use this meter is not often also to measure only one persent of light from feull frame normally give the poor but a meter that only measured the light in the central one percent of the full frame would typically take not so good pictures

Besides, under or overexposed depending on the situation.

So when should you use the spot meter?
I think that you use this technic when you want to focus on a small subject that must be outstanding property from other and also the light at it is much difference from other (one precise point of the image). For example, if you want to take the picture of the person ware brown suit that is stand in front of a brightly lit window, if you let the camera define exposure the bright light from the window will underexpose the subject so you should switch on the spot meter and expose the picture based on the subject. YES you may say that, the window light will be overexposed, but It�s ok because the important point of this picture is the person.

Exposure level method

Most digital cameras come equipped with an exposure compensation control, (EV adjustment)The camera can automatically exposure and give us as the recommended value that they calculate from your shot, but you can adjust that value up or down based on factors that you�re know of but the camera may not be smart enough to see. Each Exposure Value (EV) corresponds to changing the exposure by one stop, such as going from 1/60 -> 1/30 (+1 EV slow shutter -> increase time -> to gain more the light) or 1/15 to 1/30 (-1 EV faster shutter -> reduce time -> to gain less light).
This 2 pictures I had take for comparing the EV over and under:

Underexposure

Overexposure

Besides, To use the EV control on your camera, follow these steps:
1. Size up the scene you want to shoot. Decide if it calls for over- or underexposure.

2. If you need to add light to a scene to properly expose it, add exposure by setting the EV control to +1. If you instead need to underexpose the scene, set the EV control to �1.
Here�s a typical digital camera display set to EV +2:

Exposure: 3 methods for applying

Exposure level (under- middle �over):
Use the EV control on your camera to intentionally under- or overexpose your pictures beyond what the camera�s exposure sensor recommends.
see more detail in: Exposure level method

Exposure measuring:
Switch metering modes You can use a different kind of exposure meter to account for very �contrasts� images. Metering system: Measures the amount of light when framing a photo and determines the best exposure. The main digital camera metering types are: Matrix (Evaluative), Spot and Center-weighted.
see more detail in: Exposure measuring method

The Exposure lock:
Use exposure lock your exposure on a different part of the image, and then recompose the picture and shoot.
see more detail in: Exposure locking method

Exposure: ISO (DIN*, ASA)


  • ISO: The number indicating the camera sensors sensitivity to light. The higher the sensitivity, the less light is needed to make an exposure. However, the more ISO more noise. Noise: Randomly-spaced speckles (pixels) that can appear in digital images shot at high ISO numbers. Noise results in a reduction of photo detail and clarity, though it can be reduced with special noise reduction software.
  • ISO Speed The emulsion speed (sensitivity) of the film as determined by the standards of the International Standards Organization. In these standards, both arithmetic (ASA) and logarithmic (DIN) speed values are expressed in a single ISO term.
  • The value of ISO is depend on situation for digital camera:
    100-200 in the place that have normal light or in bright light
    400 in the place that not so bright may be a little dark or in the shadow
    800 up in the dark place
    And more ISO make more noise so we suggest that use in low ISo will be better in quality however, use low ISO need lower speed shutter which is using the tripod for the camera is needed. I suggest to use 100-200 for the good quality of your picture :) .

  • More detail about noise: Noise is most visible when photos are shot at ISO 200 and above with a consumer digital camera. Some digital cameras have a Super CCD where photos taken at higher ISO numbers (eg. ISO 1600) have little, if any, visible noise.

Exposure: F/stop (Fnumber or Aperture)

So far so good�but there�s one other aspect to consider, and that�s the fact that camera lenses can change the diameter of their aperture, thus letting in more or less light as needed. Every camera�no matter what it uses for film�controls the exposure with some sort of aperture.

f/stops = The size of a camera�s aperture at any given moment = f number of the lens
f/stops = the focal length of the lens / the diameter of the opening of the diaphragm.
So, if diameter is high f/stop is small and if diameter is small f/stop is high


Example,
f/22 is very, very small (not much light gets through to the image sensor or film)
f/1.2 is a huge opening that floods the image sensor or film with light.

And relationship of Same ISO can use many ways of shutter speed and aperture As you reduce the shutter speed, you need to increase the diameter of the aperture in order to have enough light to take a properly exposed picture. Of course, there�s a relationship between aperture, shutter speed, and your Image sensor/film�s ISO rating.

At a given ISO, you can take a picture with a specific aperture/shutter combination. If you double the film speed (ISO) without changing the lighting conditions, though, you have to adjust the aperture and shutter speed so that you still get a properly exposed picture.

 
Copyright 2010 Camera Dashboard. All rights reserved.
Themes by Ex Templates Blogger Templates l Home Recordings l Studio Rekaman